USER GUIDE FOR OPTICAL DISSOLVED OXYGEN SENSOR MODBUS OUTPUT MBRTU-PODO
|
JUN-2021 |
This document is applied for the following products
1. Introduction
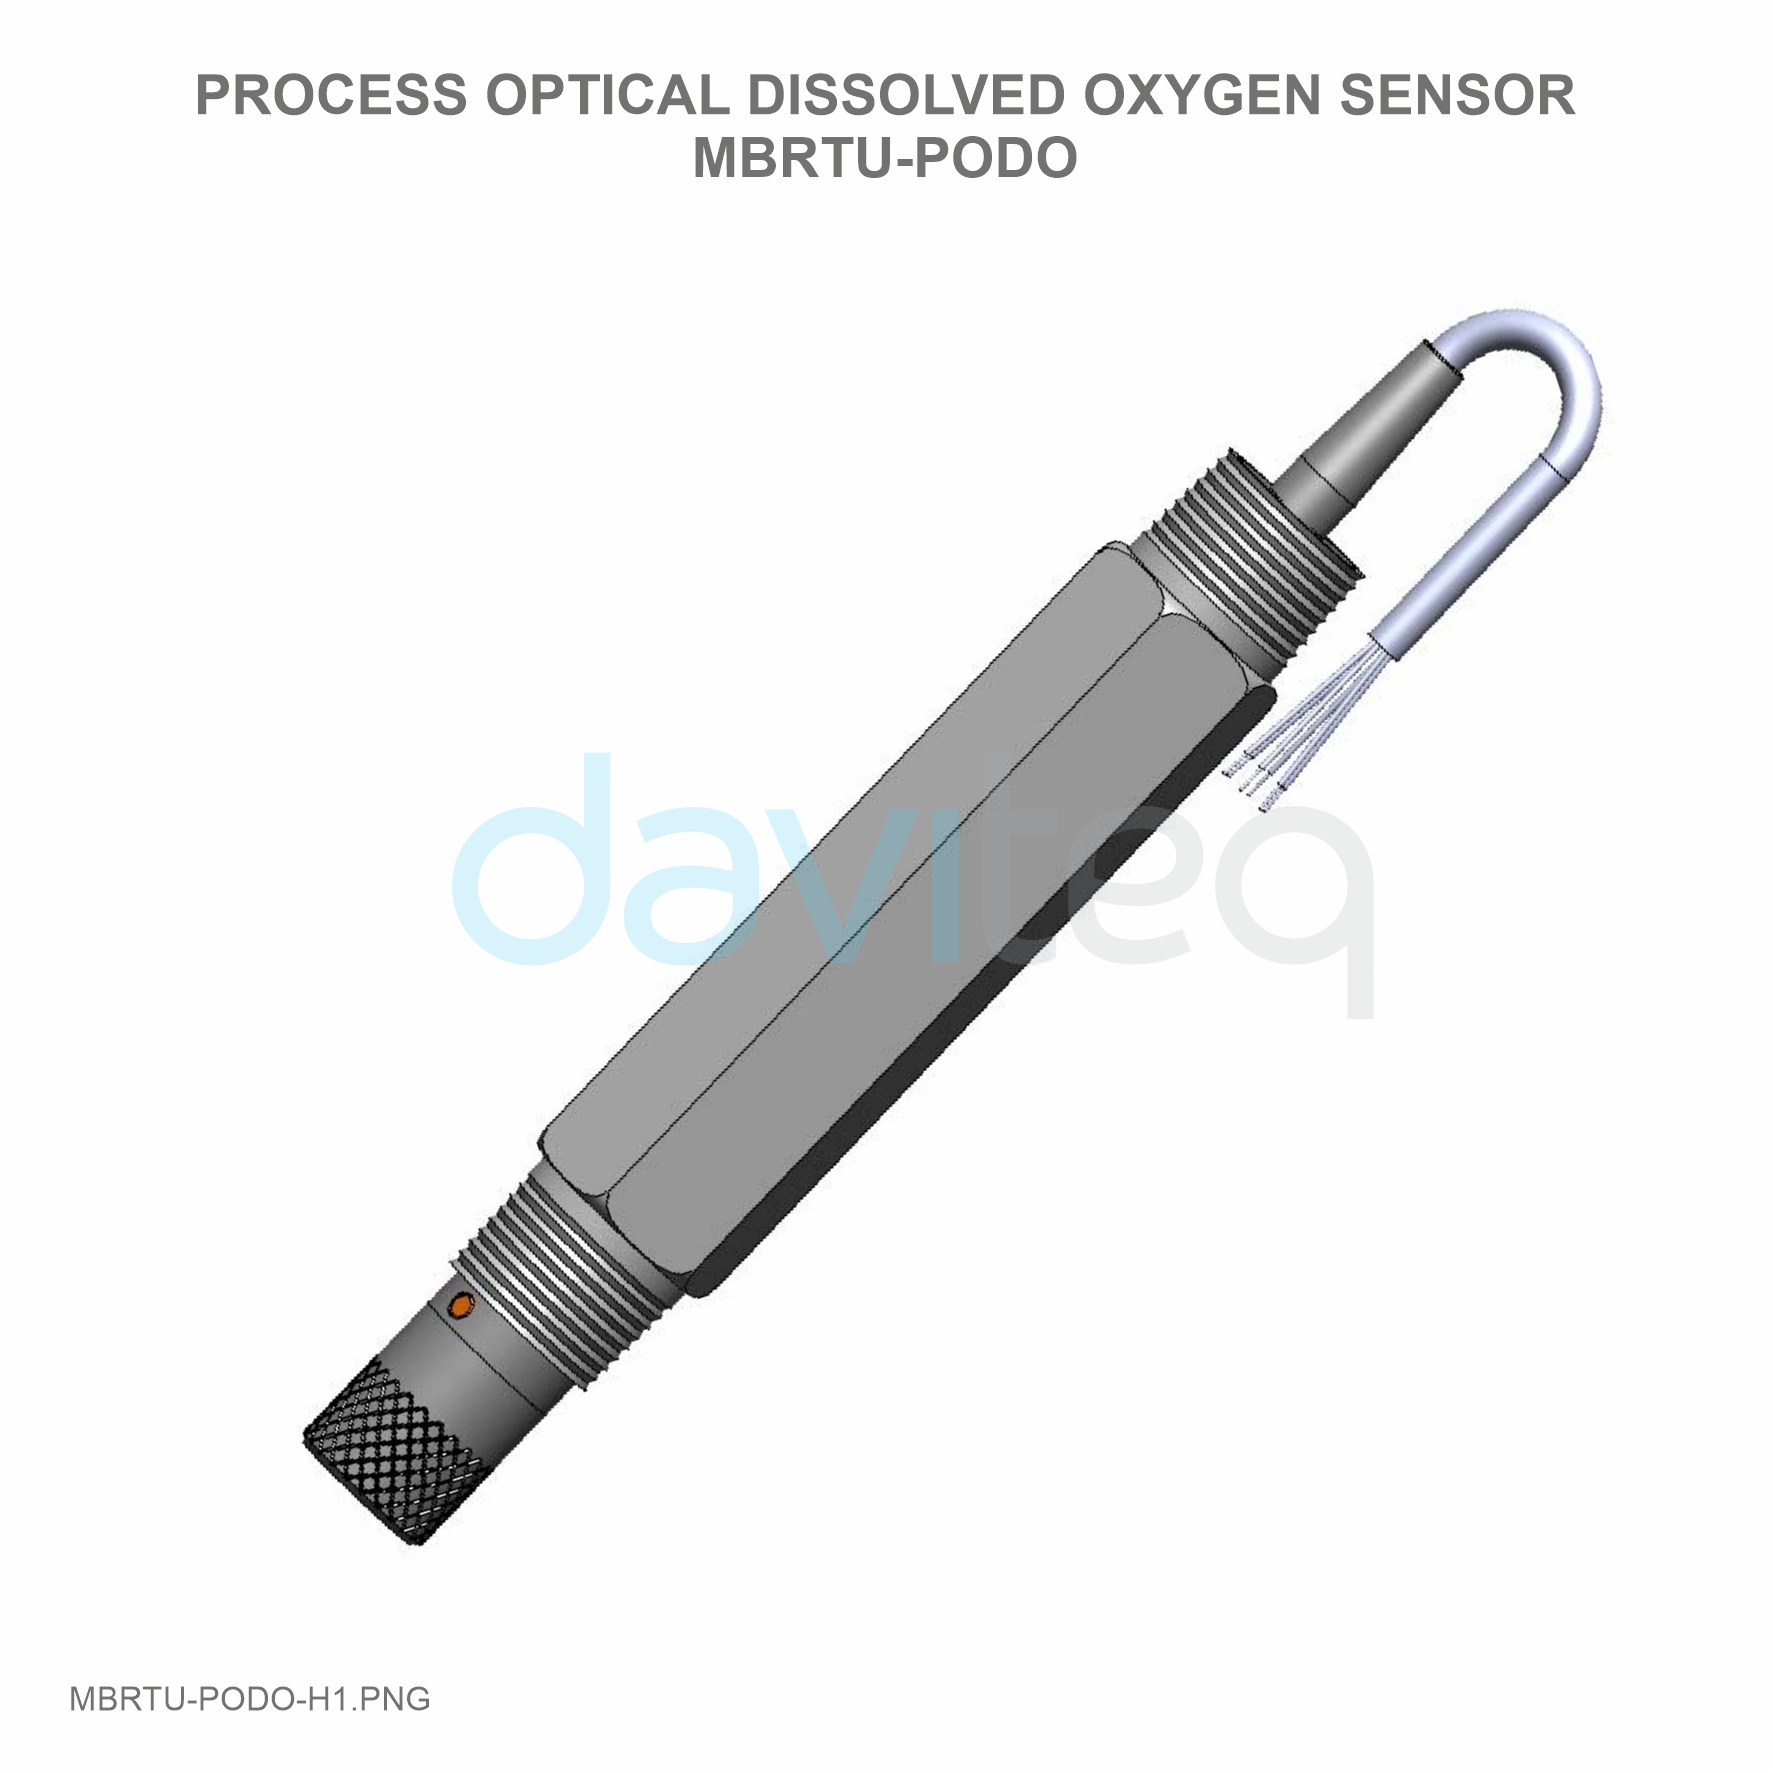
Optical Dissolved Oxygen Sensor with Modbus output MBRTU-PODO
-
Accurate and low maintenance optical dissolved oxygen technology (luminescent quenching ).
-
RS485/Modbus signal output.
-
Industry standard, robust body housing with 3⁄4” NPT on front and back.
-
Flexible cable outlet: fixed cable (0001) and detachable cable (0002).
-
Integrated (probe-mounted) waterproof pressure sensor.
-
Automatic temperature and pressure compensation.
-
Automatic salinity compensation with user-input conductivity/salinity concentration value.
-
Convenient sensor cap replacement with integrated calibration.
2. Specification
|
Range |
DO Saturation %: 0 to 500%. |
|
Response Time |
DO: T90 ~ 40s for 100 to 10%. |
|
Accuracy |
DO: 0-100% < ± 1 %. 100-200% < ± 2 %. Temperature: ± 0.2 °C. Pressure: ± 0.2 kPa. |
|
Input /output/protocol |
Input: 4.5 - 36 V DC. |
|
Calibration |
1-point (100% cal point) in air-saturated water or water-saturated air (calibration bottle). |
|
DO Compensation Factors |
Temperature: automatic, full range. 2) Compensation by default pressure value if the pressure sensor is more than 20cm of water. The default is obtained by the pressure sensor in the last 1-point calibration and recorded in probe memory. |
|
Resolution |
Low range (<1 mg/L): ~ 1 ppb (0.001 mg/L). Mid range (<10 mg/L): ~ 4-8 ppb (0.004-0.008 mg/L). High range (>10 mg/L): ~10 ppb (0.01 mg/L).* *The higher range, the lower resolution. |
|
Expected Sensor Cap Life |
A useful life of up to 2 years is feasible in optimum situations. |
|
Others |
Waterproof: IP68 rating with fixed cable. Certifications: RoHs, CE, C-Tick (in process). Materials: Ryton (PPS) body. |
3. Product Pictures
4. Wiring
Please wiring as shown below:
|
Wire color |
Description |
|
Red |
Power (4.5 ~ 36 V DC) |
|
Black |
GND |
|
Green |
UART_RX (for upgrading or PC connection ) |
|
White |
UART_TX (for upgrading or PC connection) |
|
Yellow |
RS485A |
|
Blue |
RS485B |
Note: The two UART wires could be cut if not upgrading/programming probe.
5. Calibration and Measurement
DO Calibration in Options
5.1. Reset calibration
a) Reset 100% calibration.
The user write 0x0220 = 8
b) Reset 0% calibration.
The user write 0x0220 = 16
c) Reset temperature calibration.
The user write 0x0220 = 32
5.2. 1-point calibration
1-point calibration means calibrating the probe in the point of100 % saturation, which can be obtained by one of the following means:
a) In air-saturated water (standard method).
The air-saturated water (for example of 500 mL) can be obtained by continuously (1) purging water with air using an air bubbler or some type of aeration about 3 ~ 5 minutes, or (2) stirring water by magnetic stirrer under 800 rpm for 1 hour.
After air-saturated water is ready, immerse the sensor cap and temperature sensor of the probe in the air-saturated water, and calibrate probe after the reading becomes stable (usually 1 ~ 3 minutes).
The user write 0x0220 = 1 , then waiting 30 seconds.
If the final reading of 0x0102 is not in 100 ± 0.5%, please check if the stability of current testing environment or try again.
b) In water-saturated air (convenient method).
Alternatively, the 1-pt calibration can be easily done using water-saturated air, but 0 ~ 2% error might be caused depending on different operations. The recommended procedures are given as below:
i) immerse the sensor cap and temperature sensor of the probe in fresh/tap water 1~2 minutes.
ii) get out the probe and quickly dip dry the water on the surface of sensor cap by tissue.
iii) install the sensor end in the calibration/storage bottle with a wet sponge inside. Avoid direct
contact of the sensor cap with any water in the calibration/storage bottle during this calibration
step. Keep the distance between the sensor cap and the wet sponge being ~ 2 cm.
v) wait for the readings to stabilize (2 ~ 4 minutes ) and then write 0x0220 = 2.
5.2. 2-point calibration (100% and 0% saturation points)
(i) Put the probe in air-saturated water, write 0x0220 = 1 after the DO reading stabilizes.
(ii) After DO reading becomes 100%, move the probe to zero oxygen water (use sodium sulfide added in excess to a water sample).
(iii) Write 0x0220 = 2, after the DO reading stabilizes (~at least 2 mins).
(iv) The user reading saturation at 0x0102 for 1-point calibration, 0x0104 for 2-point calibration.
- 2-point cal is not necessary for most applications, unless users need a very accurate measurement in low DO concentration (<0.5 ppm).
- Enforcement of “0% calibration” without “100% calibration” is not allowed.
5.3. Point calibration for temperature
i) The user write 0x000A = the ambient temperature x100 (Ex: If the ambient temperature = 32.15, then the user write 0x000A=3215).
ii) The user reading temperature at 0x000A . If it is equal to what you inputted, the calibration is done. If not, please try Step 1 again.
6. Modbus RTU Protocol:
6.1. Command structure:
-
Commands should not be sent sooner than 50mS from the completion of the last response.
-
If the expected response from the slave is not seen for > 25mS, throw a communication error.
-
Probe follows Modbus standard for functions 0x03, 0x06, 0x10, 0x17
6.2. Serial Transmission structure:
-
Data types are big-endian unless otherwise noted.
-
Each RS485 transmission will have: one start bit, 8 data bits, no parity bit, and two stop bits;
-
Default Baud rate: 9600 (some of the probes may have the Baudrate of 19200);
- Default Slave address: 1
-
The 8 data bits transmitted after the start bit are the most significant bit first.
-
Bit Sequence
Start bit
1
2
3
4
5
6
7
8
Stop bit
6.3. Timing:
- Firmware updates must be run within 5 seconds of power on or soft reset
Probe tip LED will be solid blue during this time
-
First command cannot be run earlier than 8 seconds from power on or soft reset
-
If there is no expected response from an issued command timeout occurs after 200ms
6.4. Modbus RTU protocol:
|
Register # |
R/W |
Details |
Type |
Notes |
|
0x0003 |
R |
LDO (mg/L) x100 |
Uint16 |
|
|
0x0006 |
R |
Saturation % x100 |
Uint16 |
|
|
0x0008 |
R/W |
Salinity (ppt) x100 |
Uint16 |
|
|
0x0009 |
R |
Pressure (kPa) x100 |
Uint16 |
|
|
0x000A |
R |
Temperature (°C) x100 |
Uint16 |
|
|
0x000F |
R |
Baud Rate |
Uint16 |
Note 1 |
|
0x0010 |
R |
Slave Address |
Uint16 |
|
|
0x0011 |
R |
Probe ID |
Uint32 |
|
|
0x0013 |
R |
Sensor Cap ID |
Uint32 |
|
|
0x0015 |
R |
Probe Firmware Version x100 |
Uint16 |
Note 2 |
|
0x0016 |
R |
Probe Firmware Minor Revision |
Uint16 |
Note 2 |
|
0x0063 |
W |
Baud Rate |
Uint16 |
Note 1 |
|
0x0064 |
W |
Slave Address |
Uint16 |
|
|
0x0100 |
R |
LDO (mg/L) |
Float |
|
|
0x0102 |
R |
Saturation % |
Float |
|
|
0x0108 |
R |
Pressure (kPa) |
Float |
|
|
0x010A |
R |
Temperature (°C) |
Float |
|
|
0x010C |
R/W |
Current Probe Datetime |
6 bytes |
Note 3 |
|
0x010F |
R |
Error bits |
Uint16 |
Note 4 |
|
0x0117 |
R |
Salinity (ppt) |
Float |
|
|
0x0132 |
R/W |
Temperature Offset |
Float |
|
|
0x0220 |
R/W |
Calibration Bits |
Uint16 |
Note 5 |
|
0x02CF |
R |
Membrane Cap Serial Number |
Uint16 |
|
|
0x0300 |
W |
Soft restart |
Uint16 |
Note 6 |
Note:
-
Note 1: Baud rate values: 0= 300, 1= 2400, 2= 2400, 3= 4800, 4= 9600, 5= 19200, 6=38400, 7= 115200.
-
Note 2: Firmware version is address 0x0015 divided by 100, then a decimal then address 0x0016.
Example: if 0x0015 = 908 and 0x0016 = 29, then the firmware version is v9.08.29.
-
Note 3: Probe has no RTC, if probe is not supplied continuous power or is reset all values will reset to 0.
Datetime bytes are year, month, day, day, hour, minute, second. Most significant to least.
Example: iftheuserwrites0x010C=0x010203040506,thentheDatetime will be set to February 3rd, 2001 4:05:06 am.
- Note 4: Bits are counted least significant to most, starting at 1:
o Bit 1 = Measurement Calibration Error.
o Bit 3 = Probe Temperature out of range, maximum 120 °C.
o Bit 4 = Concentration out of range: minimum 0 mg/L, maximum 50 mg/L. o Bit 5 = Probe Pressure Sensor Error.
o Bit 6 = Pressure Sensor out of range: minimum 10 kPa, maximum 500 kPa.
Probe will use default pressure = 101.3 kPa.
o Bit 7 = Pressure Sensor Communication error, Probe will use default pressure = 101.3 kPa.
- Note 5:
| Write (0x0220) | 1 |
Run 100% calibration. |
| 2 | Run 0% calibration. | |
| 8 |
Reset 100% calibration. |
|
| 16 |
Reset 0% calibration. |
|
| 32 |
Reset temperature calibration. |
-
Note 6: If 1 is written to this address a soft restart is performed, all other read/writes are ignored.
-
Note 7: if the probe has a built in pressure sensor this is a read only address.
-
Note 8: These Values are results of 2 point calibration, while the address of 0x0003 and 0x0006 present the results of 1 point calibration.
6.5. Example Transmissions
CMD: Read Probe Data
Raw Hex: 01 03 0003 0018 B5C0
|
Address |
Command |
Start Address |
# of Registers |
CRC |
|
0x01 |
0x03 |
0x0003 |
0x0018 |
0xB5C0 |
|
1 |
Read |
3 |
0x18 |
Example 1 response from probe:
Raw Hex: 01 03 30 031B 0206 0000 2726 0208 0BB8 27AA 0AAA 0000 0000 0000 0BB8 0005 0001 0001 0410 0457 0000 038C 0052 0001 031D 2741 0000 FAD4
|
Concentration (mg/L) |
Saturation % |
Salinity (ppt) |
Pressure (kPa) |
Temperature (°C) |
Concentration 2pt (mg/L) |
Saturation % 2pt |
|
0x031B |
0x2726 |
0x0BB8 |
0x27AA |
0x0AAA |
0x031D |
0x2741 |
|
7.95 mg/L |
100.22% |
30 ppt |
101.54 kPa |
27.30 °C |
7.97 mg/L |
100.49% |
Example 2 response from probe:
Raw Hex: 01 03 30 0313 0206 0000 26F3 0208 0000 27AC 0AC8 0000 0000 0000 0000 0005 0001 0001 0410 0457 0000 038C 0052 0001 031A 2748 0000 5BC0
|
Concentration (mg/L) |
Saturation % |
Salinity (ppt) |
Pressure (kPa) |
Temperature (°C) |
Concentration 2pt (mg/L) |
Saturation % 2pt |
|
0x0313 |
0x26F3 |
0x0000 |
0x27AC |
0x0AC8 |
0x031A |
0x2748 |
|
7.87 mg/L |
99.71% |
0 ppt |
101.56 kPa |
27.60 °C |
7.94 mg/L |
100.56 % |
CMD: Run 100 % Calibration
Raw Hex: 01 10 0220 0001 02 0001 4330
|
Address |
Command |
Start Address |
# of Registers |
# of Bytes |
Value |
CRC |
|
0x01 |
0x10 |
0x0220 |
0x0001 |
0x02 |
0x0001 |
0x4330 |
|
1 |
Write Multi |
544 |
1 |
2 |
Run 100% Cal |
Raw Hex: 01 10 0220 0001 01BB Success!
CMD: Run 0 % Calibration
Raw Hex: 01 10 0220 0001 02 0002 0331
|
Address |
Command |
Start Address |
# of Registers |
# of Bytes |
Value |
CRC |
|
0x01 |
0x10 |
0x0220 |
0x0001 |
0x02 |
0x0002 |
0x0331 |
|
1 |
Write Multi |
544 |
1 |
2 |
Run 0% Cal |
Example 1 response from probe:
Raw Hex: 01 10 0220 0001 01BB Success!
CMD: Update Salinity = 45.00 ppt, Pressure =101.00 kPa, and Temperature = 27.00 °C
Raw Hex: 01 10 0008 0003 06 1194 2774 0A8C 185D
|
Address |
Command |
Start Address |
# of Registers |
# of Bytes |
Value |
CRC |
|
0x01 |
0x10 |
0x0008 |
0x0003 |
0x06 |
0x1194 2774 0A8C |
0x185D |
|
1 |
Write Multi |
719 |
1 |
2 |
45, 101, 27 |
Example 1 response from probe:
Raw Hex: 01 10 0008 0003 01CA Success!
CMD: Update Cap Number with 1111
Raw Hex: 01 10 02CF 0001 02 0457 D751
|
Address |
Command |
Start Address |
# of Registers |
# of Bytes |
Value |
CRC |
|
0x01 |
0x10 |
0x02CF |
0x0001 |
0x02 |
0x0457 |
0xD751 |
|
1 |
Write Multi |
719 |
1 |
2 |
1111 |
Example 1 response from probe:
Raw Hex: 01 10 02CF 0001 304E Success!
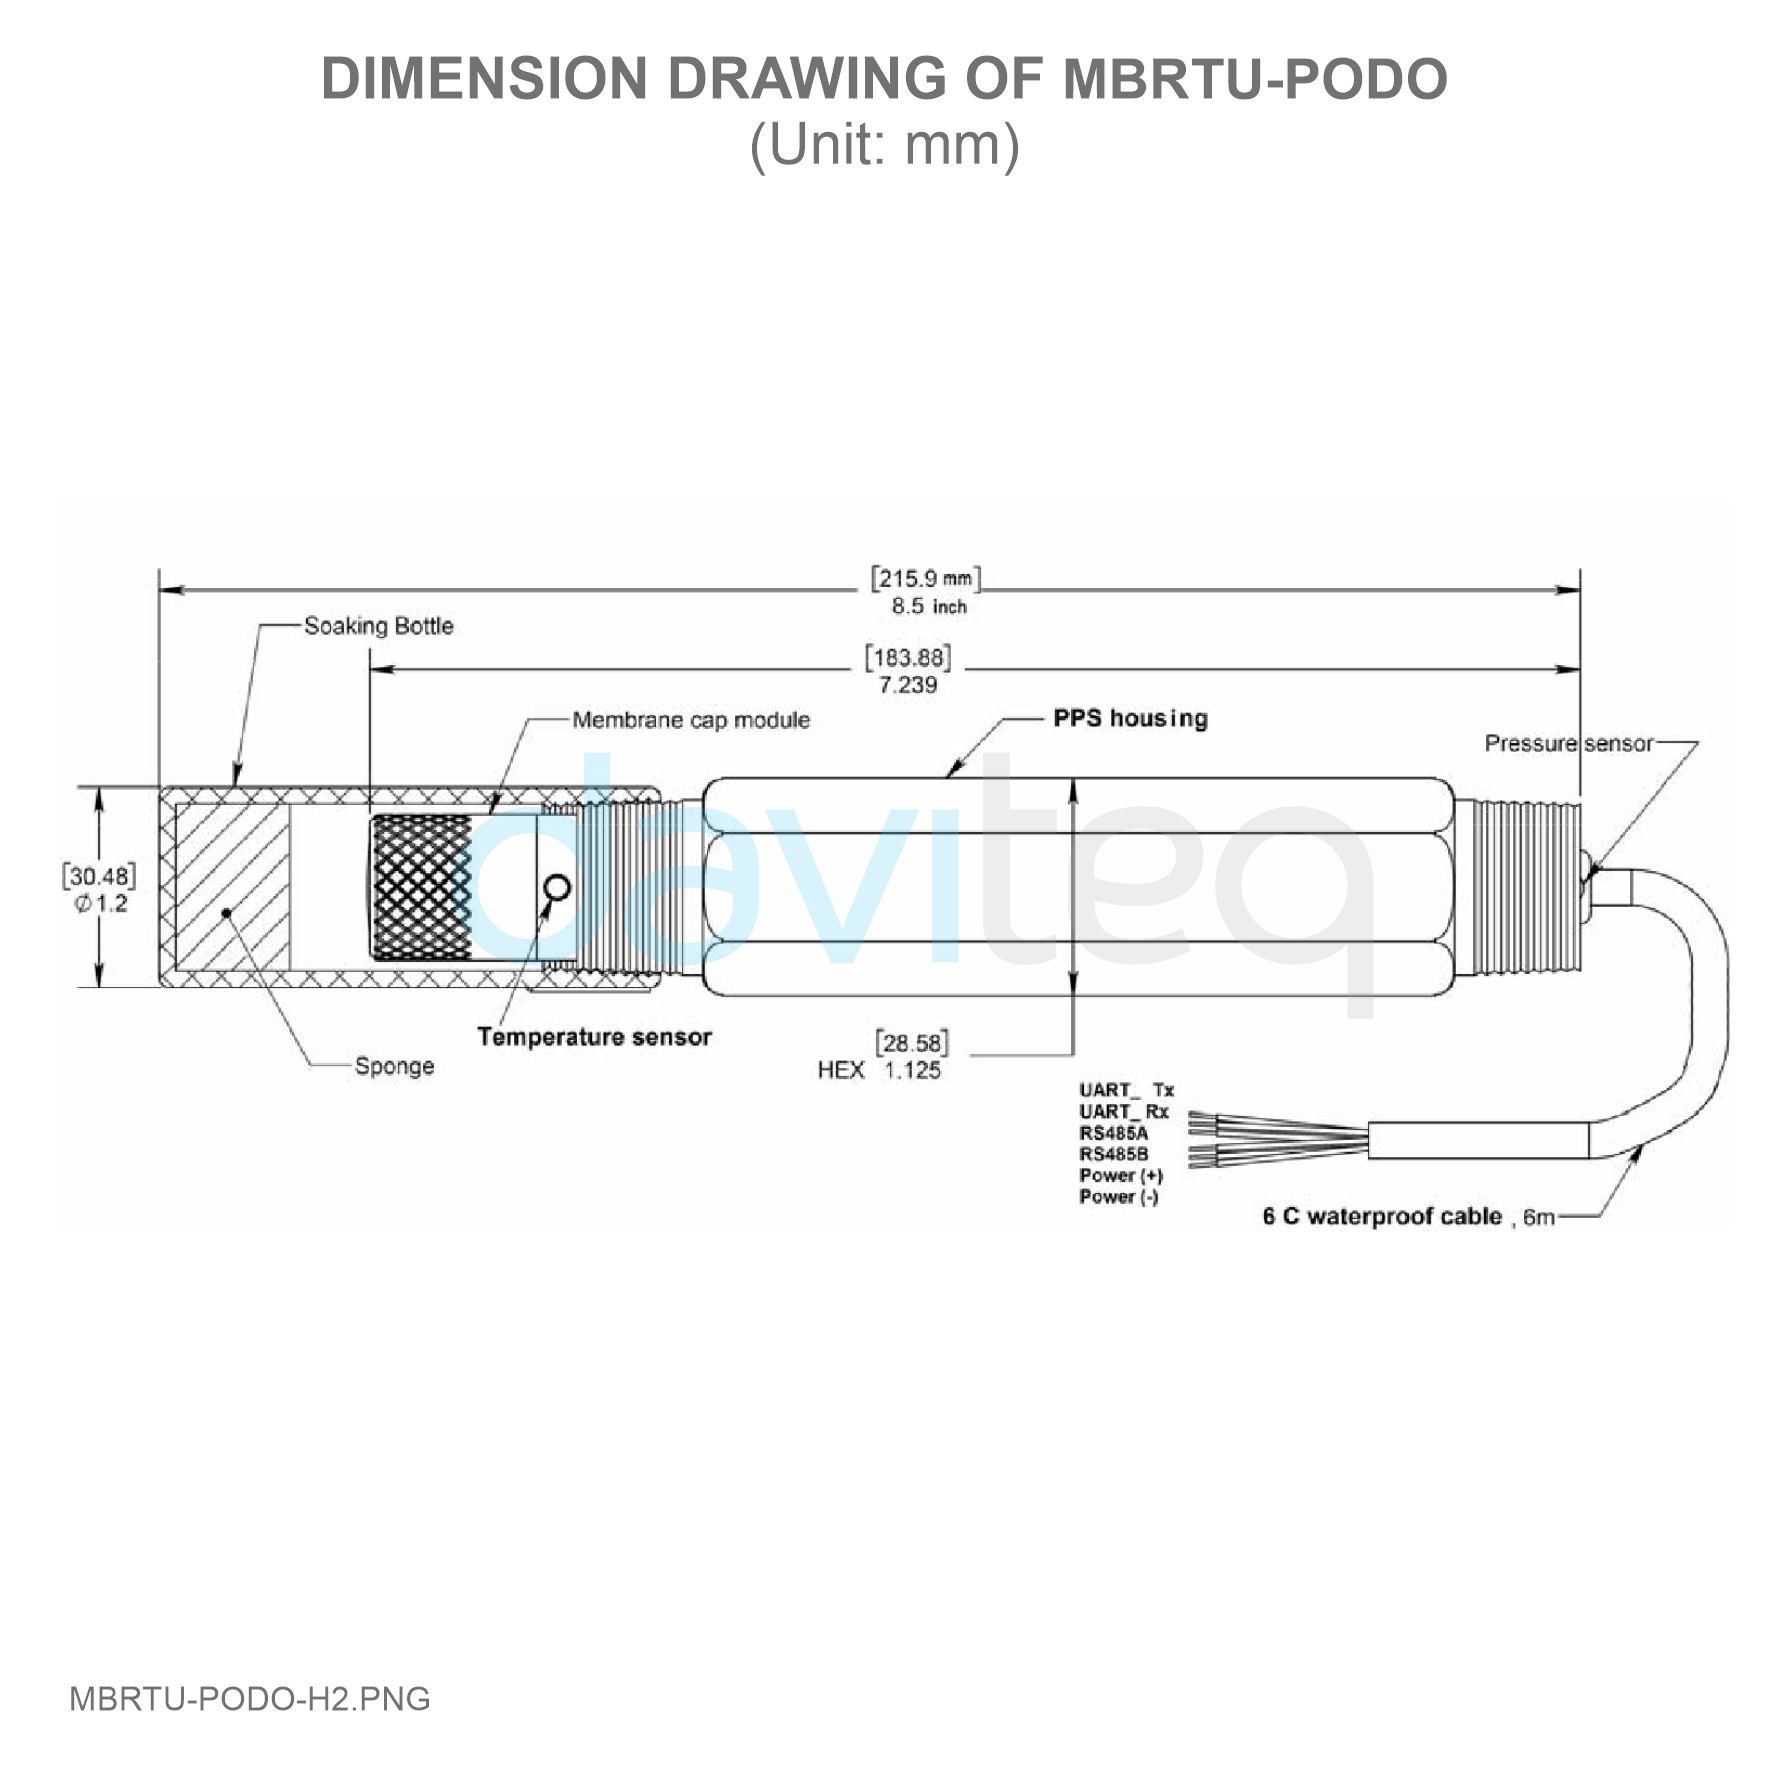
7. Dimensions
8. Maintenance
8.1. Probe maintenance includes cleaning the sensor cap, as well as the proper conditioning, preparation, and storage of the test system.
8.2. When the probe is not in use, it is highly recommended to store the probe with its sensor cap installed and the calibration/storage bottle which was included in the original packaging, threaded onto the probe. A beaker of clean water or a moist/humid capping mechanism can also suffice if the calibration/storage bottle is not available. The sponge inside the calibration/storage bottle should be kept moist for best results.
8.3. Avoid sensor cap touching organic solvent, scratching, and abusive collisions to strengthen and lengthen the working life of the sensor cap. Special care should be taken to clean the coating of cap, to dip probe and cap in fresh water, and then to tap dry the surface with a tissue. Do not wipe the coating surface.
8.4. Replace the sensor cap, if the cap coating is faded or stripped away. DO NOT touch the clear window on the probe tip after unscrewing the old cap. If any contaminants or residue are present on the window or inside the cap, carefully remove them with a powder free wipe. Then re-screw the new sensor cap onto the probe.
9. Contact
|
Manufacturer Daviteq Technologies Inc
No.11 Street 2G, Nam Hung Vuong Res., An Lac Ward, Binh Tan Dist., Ho Chi Minh City, Vietnam. Email: info@daviteq.com | www.daviteq.com |
No Comments