USER GUIDE FOR PROCESS FLAT PH SENSOR WITH MODBUS OUTPUT MBRTU-PHFLAT
|
JUL-2021 |
This document is applied for the following products
1. Introduction
MBRTU-PHFLAT is a general purpose in-line (continuous measurement) pH sensor offering affordable, flat sensor application coverage for many water applications such as drinking water, industrial water, aquaculture, tank installations or related applications. The flat surface sensor is often referred to as "self-cleaning" when installed in a process stream since the water flow has a tendency to "shear off" biofouling and other debris from the sensor surface. Output is Modbus RTU for easily integrating with any PLC, controller, SCADA, BMS or IoT gateway.
- Robust pH electrode for continuous measurement;
- Self-cleaning flat electrode;
- Standard ModbusRTU output;
- Plug & Play.
Typical Applications: Drinking water, Waste water, Industrial water, Aquaculture,...

2. Specification
| pH SENSOR SPECIFICATION | |
| Sensing Technology | Glass, combine electrode with Pt100 temperature sensor |
| Measuring range | pH 0 .. 14 |
| Resolution | pH 0.1 |
| Accuracy | +/- 0.1 |
| Working temperature | 0 .. 100 oC (compensated) |
| Working pressure | 0 .. 100 psig |
| Process connection | 3/4" NPT both ends |
| Wetted parts | PVC |
| Sensor Cable | 6m with BNC connector |
| Rating | IP68 |
| Sensor Dimension | D27 x 172 (mm) |
| Sensor net weight | < 200 grams |
| pH TRANSMITTER SPECIFICATION | |
| Inputs | pH and Pt100 |
| Output | RS485, ModbusRTU protocol, max 19200 baud |
| Power supply | 9..36VDC, avg. < 200mA |
| Mounting | DIN Rail |
| Working temperature | -40 .. 85 oC |
| Working humidity | 0 .. 95% RH, non-condensing |
| Housing | Engineered Plastic |
| Ingress Protection | IP20 |
| Dimension | 93 x 40 (mm) |
| Net weight | <200 grams |
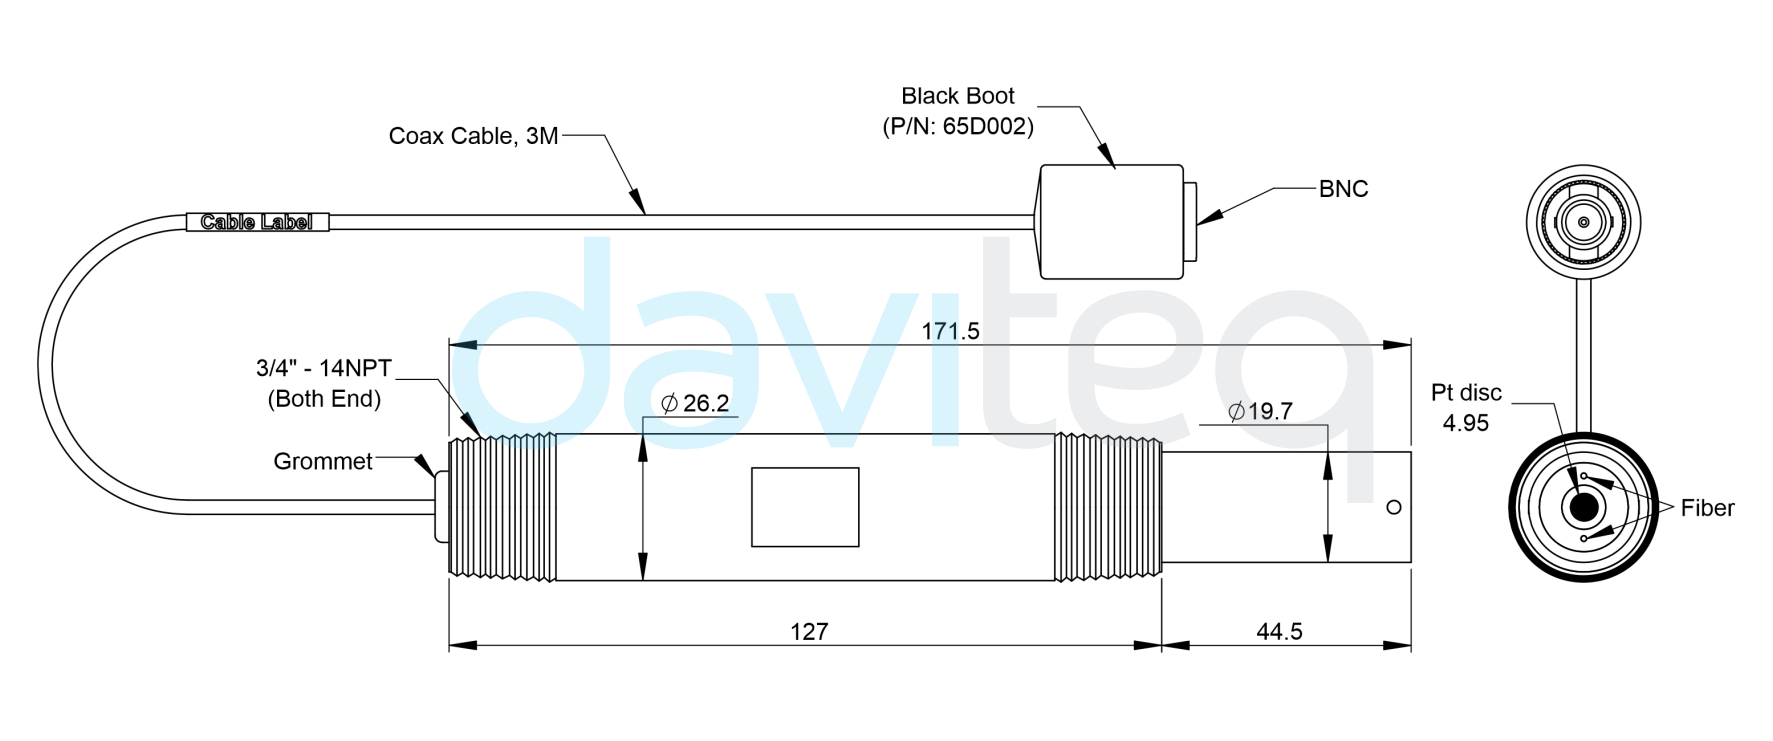
3. Dimensions
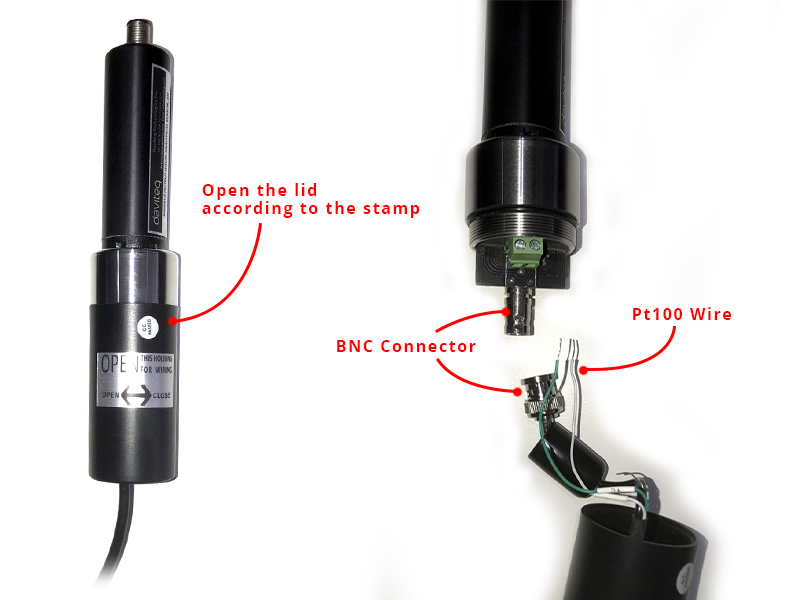
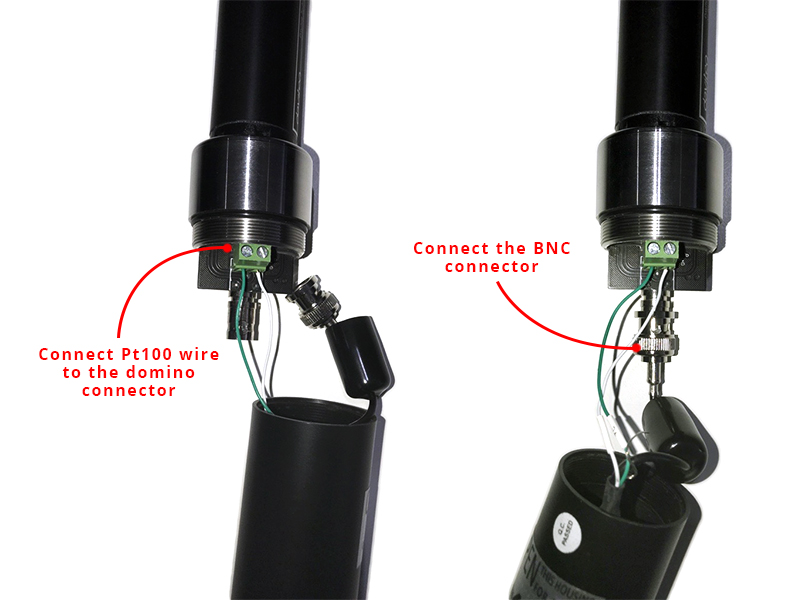
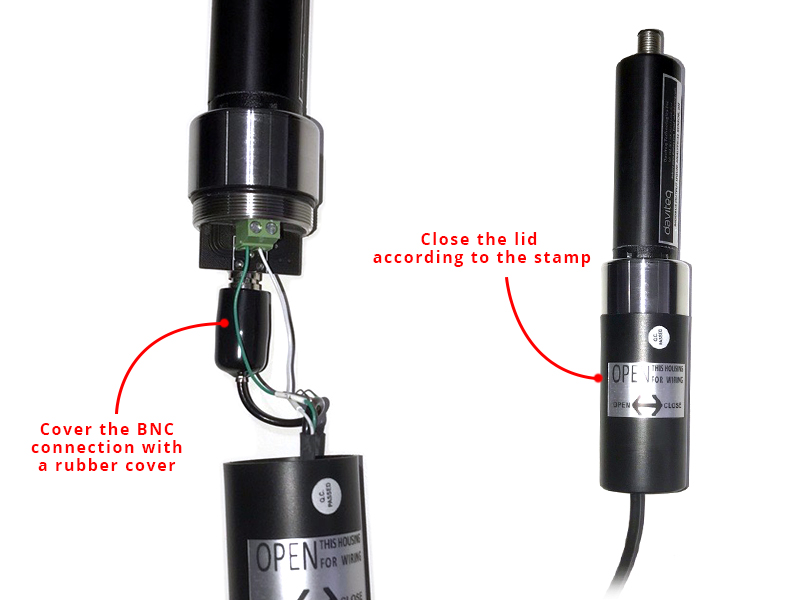
4. Wiring
Please wiring as shown below:
 |
 |
 |
5. Memmap registers
- Function Code: 3 (Read); 16 (Write)
| Modbus Register (Dec) | Modbus Register (Hex) | Function Code (Read) | Function Code (Write) | # of Registers | Description | Range | Default | Format | Property | Comment |
| 2 | 2 | 3 | 4 | Firmware version | string | Read | ||||
| 6 | 6 | 3 | 2 | Hardware version | string | Read | ||||
| 9 | 9 | 3 | 2 | pH (prm 1) | float | Read | ||||
| 11 | B | 3 | 1 | error & sensor type | uint16 | Read | Hi-Byte is error code, Lo-Byte is sensor type | |||
| 12 | C | 3 | 2 | Temperature (prm 2) | float | Read | ||||
| 14 | E | 3 | 2 | pH_Adc | float | Read | ||||
| 16 | 10 | 3 | 2 | pH_mV | float | Read | ||||
| 18 | 12 | 3 | 2 | tempRes | float | Read | ||||
| 256 | 100 | 3 | 16 | 1 | Modbus address | 1-247 | 1 | uint16 | Read/Write | Modbus address of device |
| 257 | 101 | 3 | 16 | 1 | Modbus baudrate | 0-1 | 0 | uint16 | Read/Write | Baudrate: 0: 9600, 1: 19200 |
| 258 | 102 | 3 | 16 | 1 | Modbus parity | 0-2 | 0 | uint16 | Read/Write | Parity: 0: none, 1: odd, 2: even |
| 280 | 118 | 3 | 16 | 2 | a1 | 1 | float | Read/Write | Scale value of parameter_1 = (a1 * Raw sensor value of parameter_1) + b1 | |
| 282 | 11A | 3 | 16 | 2 | b1 | 0 | float | Read/Write | Scale value of parameter_1 = (a1 * Raw sensor value of parameter_1) + b1 | |
| 284 | 11C | 3 | 16 | 2 | a2 | 1 | float | Read/Write | Scale value of parameter_2 = (a2 * Raw sensor value of parameter_2) + b2 | |
| 286 | 11E | 3 | 16 | 2 | b2 | 0 | float | Read/Write | Scale value of parameter_2 = (a2 * Raw sensor value of parameter_2) + b2 | |
| 298 | 12A | 3 | 16 | 1 | calcTime (sec) | 1 | uint16 | Read/Write | Set default 1 sec for MBRTU | |
| 299 | 12B | 3 | 16 | 1 | calibEnb | 0 | uint16 | Read/Write | Before calibration, must turn on caribE = 1. After calibration, set calibEnb = 0 | |
| 300 | 12C | 3 | 16 | 2 | pHFeedback | float | Read/Write | Step 1: Calibrate with standard solution pH = 7.01, wait for about 3 minutes for the reading to stabilize, write 7 down to pHFeedback Step 2: Calibrate with standard solution pH = 4.01 or 10.01, wait about 3 minutes for reading to stabilize, write down pHFeedback pH value of solution |
||
| 302 | 12E | 3 | 16 | 2 | pHFactor | float | Read | |||
| 304 | 130 | 3 | 16 | 2 | pH7_adc | float | Read | |||
| 306 | 132 | 3 | 16 | 2 | pH7_mV | float | Read | |||
| 308 | 134 | 3 | 16 | 2 | wire resistance | 1.74 | float | Read/Write | Compensate for conductor resistance | |
| 310 | 136 | 3 | 16 | 2 | Manual_Temp_Input | float | Read/Write | |||
| 312 | 138 | 3 | 16 | 1 | Manual_Temp_Enb | 0 | uint16 | Read/Write | When there is no temperature sensor, turn on Manual_Temp_Enb = 1, then Temperature (prm 2) = Manual_Temp_Input |
Note 1: Before calibrating the sensor, set calibEnb = 1, after calibrating the sensor, set calibEnb = 0
Note 2:
- Step 1: Calibrate with standard solution pH = 7.01, wait about 3 minutes for the reading from the sensor to stabilize, write 7 down to pHFeedback
- Step 2: Calibrate with standard solution pH = 4.01 or 10.01, wait about 3 minutes for the reading to stabilize, write down the pHFeedback pH value of the solution.
Note 3: When there is no temperature sensor, set Manual_Temp_Enb = 1, then Temperature (prm 2) = Manual_Temp_Input
6. Required Equipment and Solutions
- pH meter (a temperature compensator is recommended for increased pH measurement accuracy)
- pH Buffer 4.01 or 10.01
- pH Buffer 7.01
- Reference filling solution (see list for particular pH electrode type)
- Wash bottle filled with distilled or de-ionized water
- Laboratory magnetic stirrer and magnetic stir bars
- Lab wipes
- Clean beakers
7. Preparation of the Electrode for Initial Use
- Remove the protective bottle or cover from the electrode and thoroughly rinse the electrode with distilled water. Wipe carefully with a clean lab wipe.
- During shipment, air bubbles may have migrated into the electrode sensing bulb. Hold the electrode up to the light and inspect the sensing bulb for air bubbles. If air is seen, carefully shake the electrode downward (like a thermometer) to dispel the air bubble from the sensing bulb at the tip of the electrode.
- For refillable models, uncover the filling port to expose the electrode reference chamber fill hole (for sealed, gel filled electrodes, disregard this operation).
- Fill the reference chamber with the appropriate pH reference filling solution. Electrodes that have been filled with the incorrect filling solution are not covered under warranty.
8. Reference Filling Solution Selection
- For pH combination electrodes with Calomel and Double Junction Ag/AgCI reference half cells, use 4 M KCI reference filling solution.
- For pH combination electrodes with Single Junction Ag/AgCI reference half cells, use 4 M KCI saturated with AgCI reference filling solution.
9. Calibration
Before use, the instrument should be calibrated with standard solutions;
The first is calibration with standard solution pH = 7.01. Buy standard solutions here:
The next step is to calibrate with standard solution pH = 4.01 or 10.01. Buy standard solutions here:
Note the ambient temperature at the time of calibration to input the standard pH value according to the temperature (indicated on the body of the standard bottle)
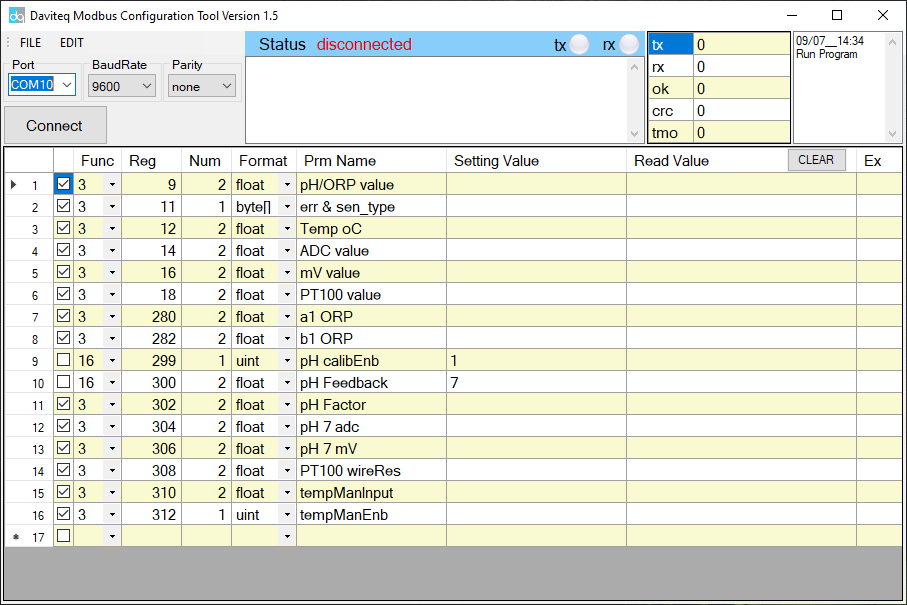
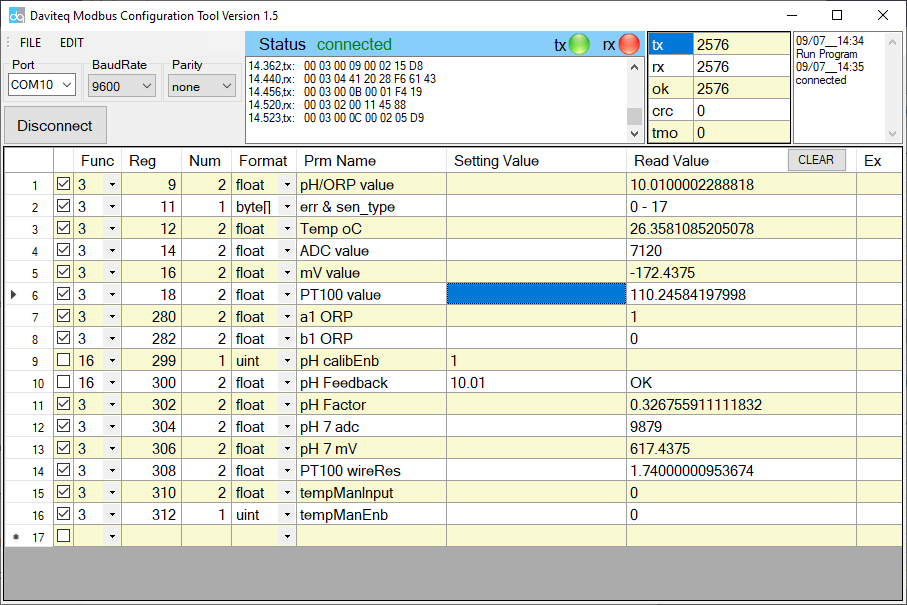
Use any modbus master tool to calibrate the sensor. Or use Daviteq's Modbus software, along with a configuration cable...
How to use Modbus Configuration Tool (Click Here)
Step 1: Import the Template file into Modbus Configuration Tool
Step 2: Place pH sensor to into a beaker containing pH=7.01 buffer but not calibrated yet
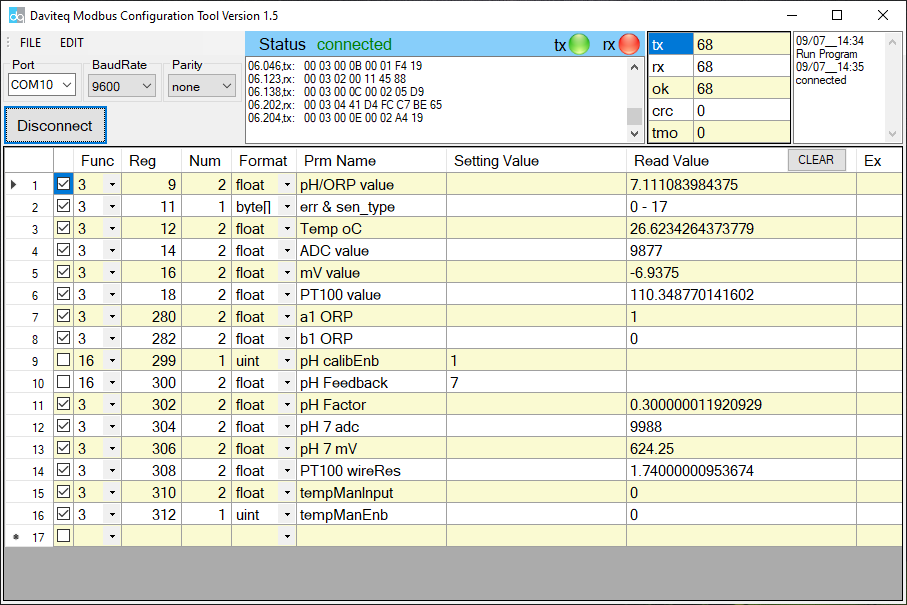
Step 3: Wait about 3 minutes for the reading from the sensor to stabilize, write 7 down into pHFeedback Register 300 and value=1 for phcalibEnb Reg 299 by using Func 16
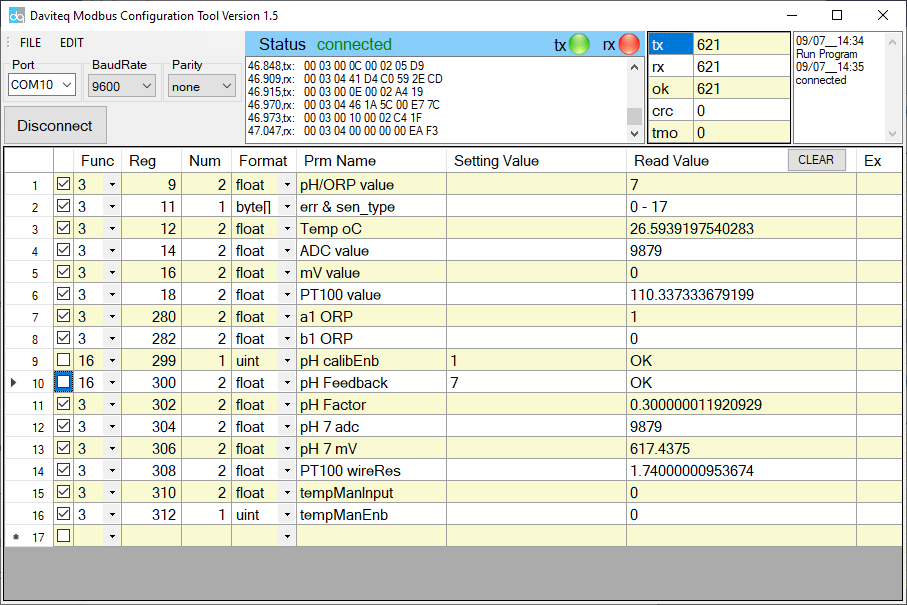
Step 4: Remove the electrode from the buffer. Rinse with distilled water and blot with a lab wipe then put it to pH=10.01 standard
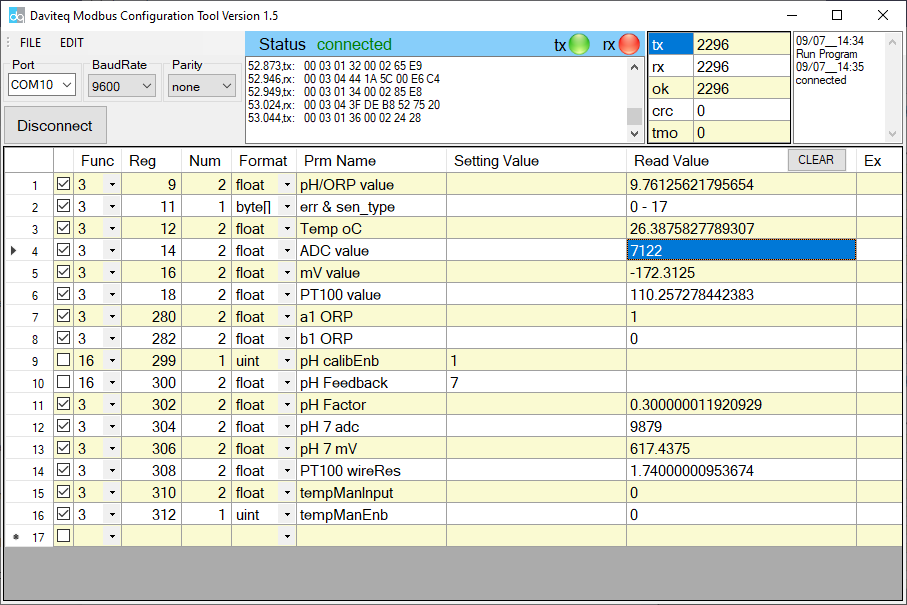
Step 5: Wait about 3 minutes for the reading to stabilize, write down the pHFeedback with 10 into Reg 300
Step 6: Write down the pHcalibEnb with 0 into Reg 299 to stop the calibration. Then rinse the electrode with distilled water and wipe carefully with a clean lab wipe.
10. Reading a Sample with the Electrode
- Rinse the electrode with distilled water and blot with a lab wipe. Place the electrode in a beaker containing the sample and a stir bar. The sample should be at the same temperature as the buffers used to standardize the electrode. Stir as before. Record the pH when the reading is stable.
- Remove the electrode from the sample, rinse the electrode with distilled water over the "waste" beaker. Blot the electrode dry with a lab wipe. The electrode is now ready to read the pH of other samples.
11. Storing the Electrode
1. Sort Term
Between measurements, store the pH electrode in a beaker containing pH 4.01 buffer.
2. Long Term
When storing for longer periods, store the pH electrode in the storage bottle or the protective boot which came with the electrode. Ensure that the foam in the storage bottle or the cotton ball in the protective boot is totally wetted with pH storage solution to keep a wet environment around the pH bulb and junction. Maintain the wet environment in the storage bottle or in the protective boot during storage.
If the pH electrode is equipped with a fill hole cover, slip the cover over the fill hole.
12. Electrode Cleaning
Do not use strong solvents (e.g. acetone, carbon tetrachloride, etc.) to clean the pH electrode. Be sure to recalibrate the electrode after cleaning.
1. If the electrode has become coated with oil or grease, carefully wash the electrode under warm tap water using dish-washing detergent. Rinse thoroughly with fresh tap water followed by a rinse with distilled water. Soak the electrode in pH electrode storage solution for 30 minutes after this cleaning procedure. Recalibrate the electrode before use.
2. If the electrode has been exposed to protein or similar materials, soak in acidic pepsin for 5 minutes. Rinse thoroughly with distilled water. Soak in storage solution for 30 minutes prior to recalibration.
3. If the previous cleaning procedures fail to restore response, soak the electrode in 0.1 N HCI for 30 minutes. Rinse thoroughly with distilled water. Recalibrate before use.
4. If electrode response is not restored still, replace the electrode.
13. Contact
|
Manufacturer Daviteq Technologies Inc
No.11 Street 2G, Nam Hung Vuong Res., An Lac Ward, Binh Tan Dist., Ho Chi Minh City, Vietnam. Email: info@daviteq.com | www.daviteq.com |
No Comments